Like most programs, Capture One and Lightroom have strengths and weaknesses. So, let’s compare the features of Capture One vs Lightroom [ExpertPhotography is supported by readers. Product links on ExpertPhotography are referral links. If you use one of these and buy something, we make a little bit of money. Need more info? See how it all works here.]
Comparing Capture One vs Lightroom Organization
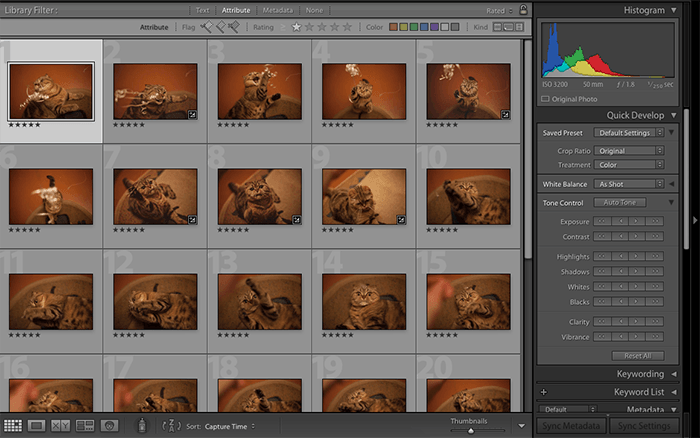
Lightroom is well known for its cataloging and organizing features. You can import thousands of photos that Lightroom will organize for you. You can also edit keywords and metadata to search for specific photos easily. Additionally, Lightroom offers advanced facial recognition. This is another feature that can make it easy to look for photos. If you often work with thousands of pictures, you’re likely to find this tool very handy. Capture One doesn’t have the same cataloging tools, but you can still use them to find images quickly. When you import your photos, they’ll end up on the right side of the screen. You can easily scroll through the list and pick your desired image.
RAW Image Processing
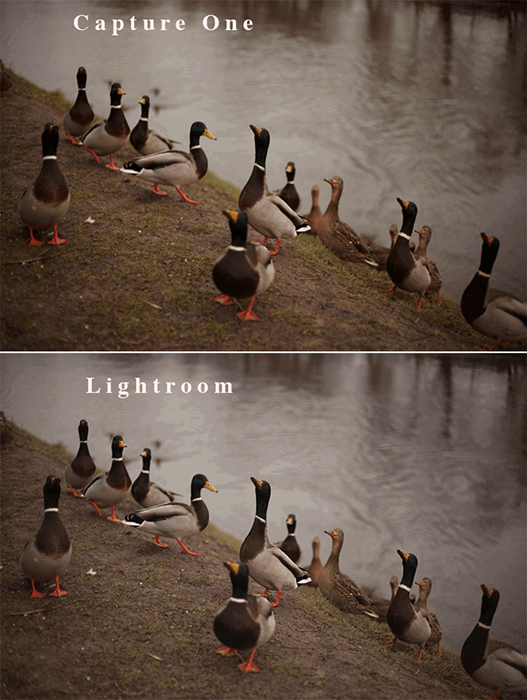
Lightroom and Capture One process RAW images in different ways. RAW files are different from JPEGs because they preserve more image data. Essentially, these files are made up of data. Different programs translate this data in different ways. The reason is that each program has its own algorithm, or translation, for RAW files. What does this mean? Every photo editing program will translate your images in a different way. Capture One adds more saturation and contrast to RAW files. Lightroom doesn’t do that to the same extent. If you compare the same RAW file in both programs, you’ll notice that the one in Capture One looks more striking. This is usually not a problem for most photographers. You can always add or reduce saturation to make your image look more appealing. It’s important to keep in mind if you care about how your original images look, though.
Lightroom vs Capture One Interface
Visuals
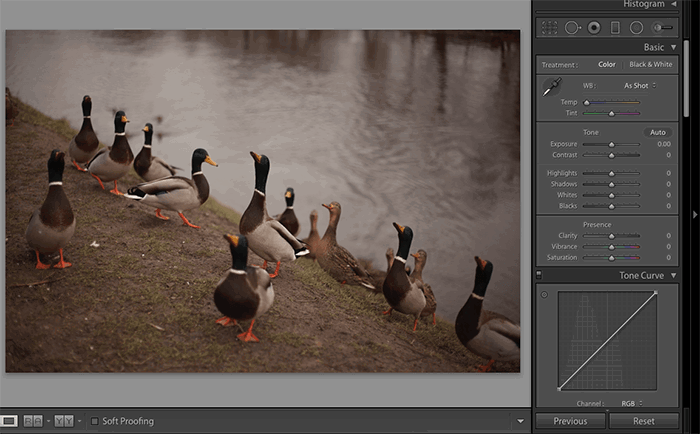
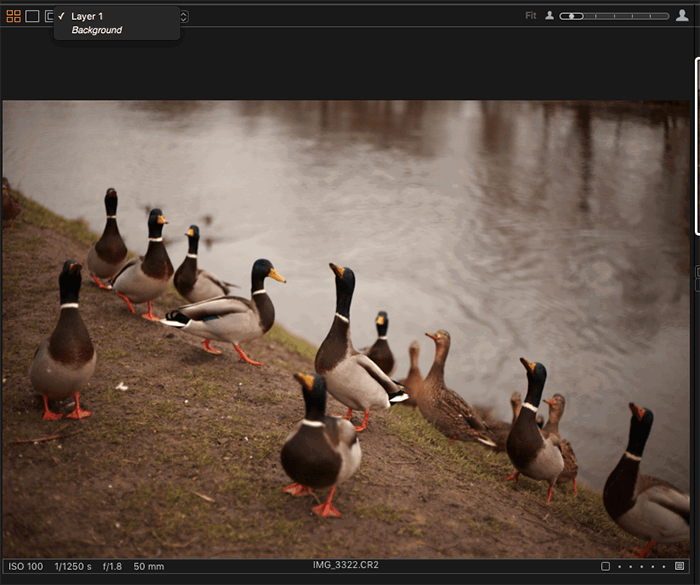
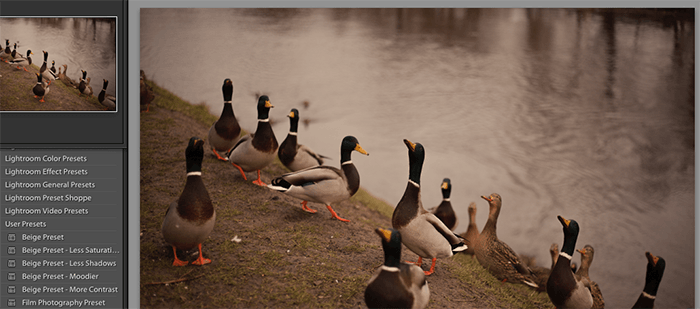
Lightroom and Capture One have very different interfaces. In Capture One, you have your image in the center. On the right-hand side, you can select your imported photos. On the left, you have a variety of adjustments. These adjustments come in different tabs. You have to switch to different tabs to edit your pictures. This can be inconvenient if you want everything in one neat tab. But this is rarely a deal-breaker. In Lightroom, you have several modules that you can use to organize, edit, print, etc. your work. You can edit your pictures in Lightroom’s Develop module. There, you can scroll through all the settings without changing tabs. Your image is in the center, and all the adjustment settings are on the right-hand side of the window. On the left-hand side, you can look at your editing history and apply presets.
Beginner-Friendly or Not?
There’s a steep learning curve for photographers who want to start with Capture One. The program has lots of advanced tools. This might make the editing process very challenging for beginners. Lightroom is more beginner-friendly, according to many users. Its interface is simpler, thanks to its straightforward modules and panels. This doesn’t mean that beginners should avoid Capture One at all costs. If you’re okay with the steep learning curve, you should have no problem using the program. You might find this transition less challenging if you’re an advanced photographer. If you transition from Lightroom to Capture One, you’ll have to get used to its unusual importing system. If you transition from Capture One to Lightroom, you’ll likely get used to the program quickly.
Editing Features
Capture One and Lightroom offer unique editing tools. Many of them are similar, but there are also a few that are exclusive to each program.
Local Adjustments
Local adjustments are specific changes. These are often necessary because general editing isn’t always accurate. For example, you might want to darken the sky without affecting any other area of your image. You can achieve this with a Gradient tool. Local adjustments are common in landscape and portrait photography editing. Lightroom’s local adjustments are the Adjustment Brush, the Graduated Filter, and the Radial Filter. Capture One has very similar tools. There isn’t a big difference between Lightroom and Capture One in this area. Both have decent local adjustment options. Both can help you edit very specific parts of your photos.
Layers
Capture One offers a layer system. This is similar to what you see in programs like GIMP and Photoshop. You can use layers to place adjustment settings on top of each other. You can think of this as painting over an image to enhance it. You can also change the opacity of these layers. This is great for making effects look less intense. It’s also an easy way to undo certain changes if you’re unhappy with your final results. Lightroom doesn’t have any layer options at all. You can create separate ‘layers’ for adjustment brushes or gradients, but that’s as far as you can go. Many photographers use Lightroom with Photoshop. Photoshop has advanced layer options and is good for detailed retouching. Also, you can pay a monthly fee to use Photoshop and Lightroom together. Many photographers find it affordable. This might be why Adobe hasn’t made any changes to Lightroom in that regard.
Color Editing
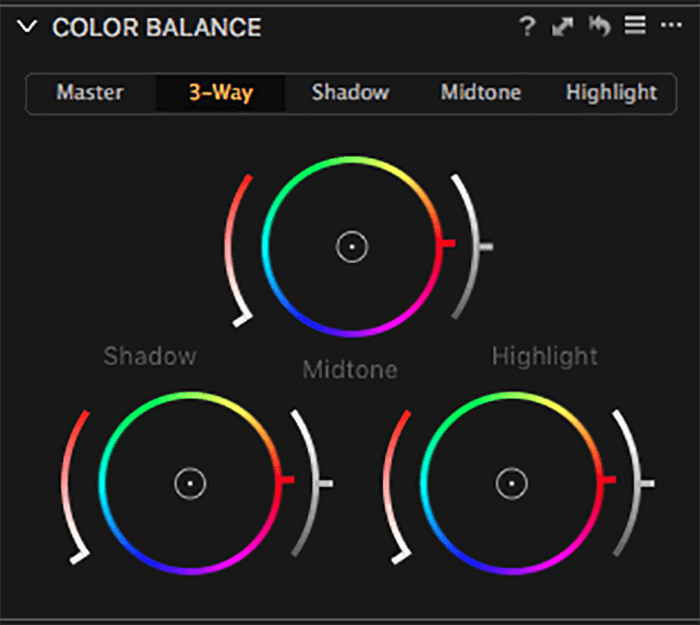
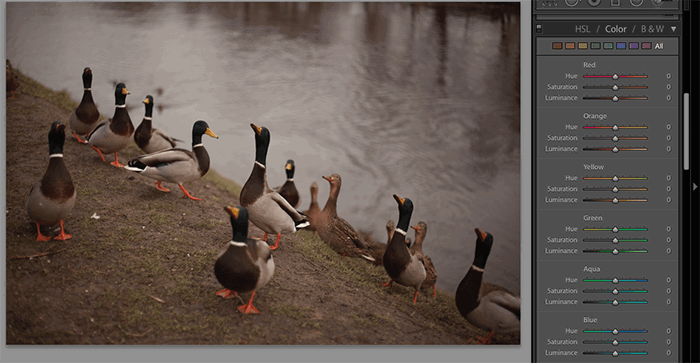
Capture One has an advanced color wheel. You can use it to change very specific colors in your images. Lightroom’s color panel is much more limited in that sense. You can use it to edit the hue, saturation, and lightness of specific colors. This is great for basic color correction. It can be a nuisance if you’re an advanced color corrector, though.
Clarity and Sharpening
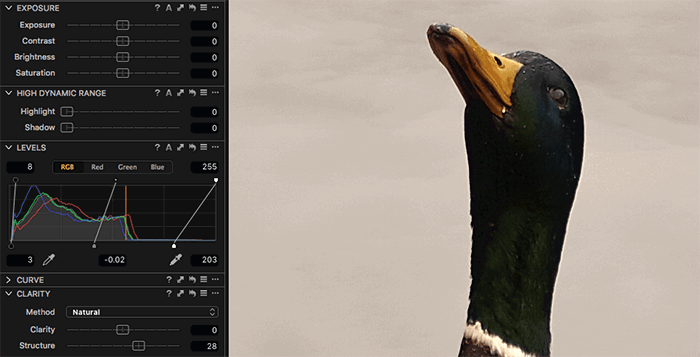
Capture One seems to be much better at sharpening photos in a non-destructive way. It also has a special Structure tool that can help you bring out the textures of your image. In Lightroom, the closest tool you can get to that is Clarity. If you drag the slider too far to the right, you’ll get results that look very unnatural. Capture One’s Structure tool seems to be a better alternative to Lightroom’s Clarity tool. If you’re a seasoned landscape photographer, this is an important feature to keep in mind.
Sliders
Capture One and Lightroom both use sliders. You can use these to intensify or dull a specific adjustment. All you have to do is drag the slider to the left or the right. Capture One’s sliders seem to be less intense than the ones in Lightroom. The difference isn’t that extreme, but it can be a problem if you want to make the most of your adjustments.
Annotations
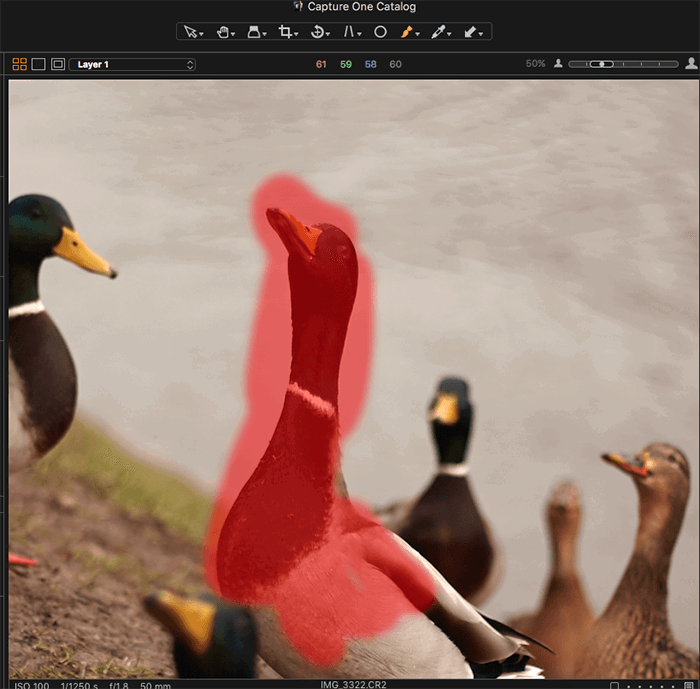
Capture One software offers a handy Annotations option. This is very handy in almost every photography genre, especially studio photography. If you’re working with a team, you don’t want to always send feedback to everyone’s email address. Your instructions might be too vague. It’s easier to give feedback by drawing on an image. Capture One makes this very easy. You can highlight specific areas of an image using the Annotations tool. You can then send these annotated images to other members of your team. This can save you a lot of time and stress.
Presets and Other Extensions
Capture One and Lightroom both offer a variety of extensions. These can make your editing process smoother. They can also let you get creative with your work.
Pre-Made Presets
Lightroom goes hand in hand with presets. You can download pre-made presets, which are basically color styles. You can use these color styles to give your photos a specific look. For example, you can make a simple photo look like a vintage picture with one click. You can also make your own custom presets in Lightroom. Many photographers have turned this into a photography business. As a result, there are millions of presets for all kinds of looks, styles, and photography genres. Lightroom also offers bulk editing. You can apply one preset to thousands of photos with one click. Wedding photographers use this very often to edit thousands of photos within minutes. Capture One has presets, too. However, they aren’t as popular as Lightroom presets. There aren’t that many in the Capture One market at the moment. You can’t use Lightroom presets with Capture One software.
HDR, Panorama, and Other Extensions
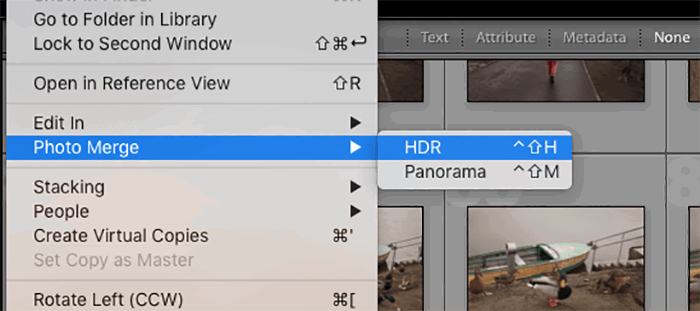
Besides presets, Lightroom offers a wide variety of extensions. You can access its HDR and panorama tools as soon as you download the program. These are some of the most efficient tools in the editing industry. You can transform your photos into seamless HDR photos or panoramas. If you have Photoshop, you can merge your photos in it without exporting them from Lightroom. You can also download external extensions made by other companies. Lightroom is compatible with all kinds of advanced programs. If you’re not happy with a certain adjustment, there’s a chance that you might find an extension to fix the problem. For example, you can download a plugin like Luminar. You’ll get access to hundreds of settings that you can use in Lightroom. Capture One offers a few extensions. But most are related to organizing and resizing pictures.
Program Versions
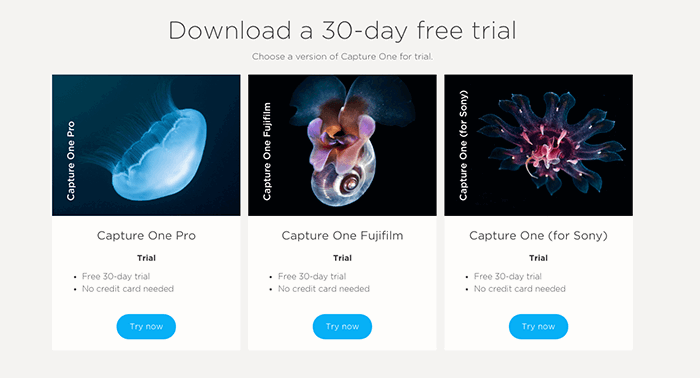
The latest version of Lightroom is made for photographers of all kinds. You don’t need a specific camera to edit your pictures efficiently. This has its pros and cons. Lightroom isn’t made for a specific camera brand, which means it’s inclusive. But it can limit photographers who use cameras that aren’t Canon or Nikon. Capture One goes beyond this by offering three different versions of its program:
Capture One Pro: This is the original program that all photographers can use. Capture One Fujifilm: This is made exclusively for Fujifilm camera users. Capture One for Sony: As the name suggests, this version is for Sony camera users.
If you’re a Sony or Fujifilm user, you can benefit greatly from Capture One’s special tools. You might find it easier to color-correct or retouch your images because of these tools.
Tethering
Capture One has tethering features which let you connect your camera to it. Studio photographers often use this to see their images immediately. This saves them a lot of time. You can adjust your camera settings from Capture One in Live Mode. All you need is a compatible camera. This is particularly handy for studio photographers who work with teams. It’s also great for those who want to edit their pictures as they’re being taken. (You’d need an extra editor for that, of course.) You can use Capture One’s official website to see if your camera is compatible with the tethering feature.
Technical Issues
Lightroom Classic tends to crash very often. Every upgrade seems to be slower than the last. This can be very frustrating for photographers with thousands of images they need to edit quickly. The older versions of Lightroom seem to be much more robust. However, if you don’t upgrade, you’ll miss many great features. Most Capture One users don’t need to deal with crashes very often. The program handles a lot of information very well. It also responds quickly to adjustment changes.
Price
Price is, of course, one of the most important things to keep in mind. Your budget, preferences, and future goals can greatly impact your decisions. Adobe now offers a subscription plan. You need to pay a monthly fee to use Lightroom. The monthly fee for Lightroom is the same as for Lightroom and Photoshop. Most photographers use both programs interchangeably, so this is a pretty good deal. The monthly fee is average when compared to services like Netflix. If you’re a professional photographer, this can be a great investment. Capture One is also a subscription-based service. The fee for the main program is almost twice as much as the one for Adobe Lightroom subscribers. If you’re a Fujifilm or Sony user, you can pay much less for Capture One Fujifilm and Capture One (for Sony). This can be a decent investment, given all the capabilities of Capture One. If unsure, you can download a free trial for both programs. You can use Lightroom for free for seven days. Capture One offers a 30-day free trial without any credit card information.
Conclusion
There are many Adobe Lightroom alternatives out there. Capture One is one of the best. Lightroom is a fantastic tool for organizing and editing photos in a few neat modules. Capture One is a brilliant program for advanced color editing, sharpening, and more. So when it comes to Capture One vs Lightroom, which is better? You will enjoy Lightroom if you like experimenting with different styles and effects. You might also like Lightroom more if you enjoy using plugins and extensions. Capture One could be ideal for you if you want to have full control over the colors in your pictures. Capture One is more crash-proof than Lightroom. This can make a huge difference in your workflow. The best thing to do is simultaneously get a free trial for Capture One and Lightroom. Experiment with as many pictures as possible. Within a week, you’ll likely figure out which program you like best.


title: “Capture One Vs Lightroom Which Is Really Better 2023” ShowToc: true date: “2023-01-16” author: “James Martin”
Like most programs, Capture One and Lightroom have strengths and weaknesses. So, let’s compare the features of Capture One vs Lightroom [ExpertPhotography is supported by readers. Product links on ExpertPhotography are referral links. If you use one of these and buy something, we make a little bit of money. Need more info? See how it all works here.]
Comparing Capture One vs Lightroom Organization
Lightroom is well known for its cataloging and organizing features. You can import thousands of photos that Lightroom will organize for you. You can also edit keywords and metadata to search for specific photos easily. Additionally, Lightroom offers advanced facial recognition. This is another feature that can make it easy to look for photos. If you often work with thousands of pictures, you’re likely to find this tool very handy. Capture One doesn’t have the same cataloging tools, but you can still use them to find images quickly. When you import your photos, they’ll end up on the right side of the screen. You can easily scroll through the list and pick your desired image.
RAW Image Processing
Lightroom and Capture One process RAW images in different ways. RAW files are different from JPEGs because they preserve more image data. Essentially, these files are made up of data. Different programs translate this data in different ways. The reason is that each program has its own algorithm, or translation, for RAW files. What does this mean? Every photo editing program will translate your images in a different way. Capture One adds more saturation and contrast to RAW files. Lightroom doesn’t do that to the same extent. If you compare the same RAW file in both programs, you’ll notice that the one in Capture One looks more striking. This is usually not a problem for most photographers. You can always add or reduce saturation to make your image look more appealing. It’s important to keep in mind if you care about how your original images look, though.
Lightroom vs Capture One Interface
Visuals
Lightroom and Capture One have very different interfaces. In Capture One, you have your image in the center. On the right-hand side, you can select your imported photos. On the left, you have a variety of adjustments. These adjustments come in different tabs. You have to switch to different tabs to edit your pictures. This can be inconvenient if you want everything in one neat tab. But this is rarely a deal-breaker. In Lightroom, you have several modules that you can use to organize, edit, print, etc. your work. You can edit your pictures in Lightroom’s Develop module. There, you can scroll through all the settings without changing tabs. Your image is in the center, and all the adjustment settings are on the right-hand side of the window. On the left-hand side, you can look at your editing history and apply presets.
Beginner-Friendly or Not?
There’s a steep learning curve for photographers who want to start with Capture One. The program has lots of advanced tools. This might make the editing process very challenging for beginners. Lightroom is more beginner-friendly, according to many users. Its interface is simpler, thanks to its straightforward modules and panels. This doesn’t mean that beginners should avoid Capture One at all costs. If you’re okay with the steep learning curve, you should have no problem using the program. You might find this transition less challenging if you’re an advanced photographer. If you transition from Lightroom to Capture One, you’ll have to get used to its unusual importing system. If you transition from Capture One to Lightroom, you’ll likely get used to the program quickly.
Editing Features
Capture One and Lightroom offer unique editing tools. Many of them are similar, but there are also a few that are exclusive to each program.
Local Adjustments
Local adjustments are specific changes. These are often necessary because general editing isn’t always accurate. For example, you might want to darken the sky without affecting any other area of your image. You can achieve this with a Gradient tool. Local adjustments are common in landscape and portrait photography editing. Lightroom’s local adjustments are the Adjustment Brush, the Graduated Filter, and the Radial Filter. Capture One has very similar tools. There isn’t a big difference between Lightroom and Capture One in this area. Both have decent local adjustment options. Both can help you edit very specific parts of your photos.
Layers
Capture One offers a layer system. This is similar to what you see in programs like GIMP and Photoshop. You can use layers to place adjustment settings on top of each other. You can think of this as painting over an image to enhance it. You can also change the opacity of these layers. This is great for making effects look less intense. It’s also an easy way to undo certain changes if you’re unhappy with your final results. Lightroom doesn’t have any layer options at all. You can create separate ‘layers’ for adjustment brushes or gradients, but that’s as far as you can go. Many photographers use Lightroom with Photoshop. Photoshop has advanced layer options and is good for detailed retouching. Also, you can pay a monthly fee to use Photoshop and Lightroom together. Many photographers find it affordable. This might be why Adobe hasn’t made any changes to Lightroom in that regard.
Color Editing
Capture One has an advanced color wheel. You can use it to change very specific colors in your images. Lightroom’s color panel is much more limited in that sense. You can use it to edit the hue, saturation, and lightness of specific colors. This is great for basic color correction. It can be a nuisance if you’re an advanced color corrector, though.
Clarity and Sharpening
Capture One seems to be much better at sharpening photos in a non-destructive way. It also has a special Structure tool that can help you bring out the textures of your image. In Lightroom, the closest tool you can get to that is Clarity. If you drag the slider too far to the right, you’ll get results that look very unnatural. Capture One’s Structure tool seems to be a better alternative to Lightroom’s Clarity tool. If you’re a seasoned landscape photographer, this is an important feature to keep in mind.
Sliders
Capture One and Lightroom both use sliders. You can use these to intensify or dull a specific adjustment. All you have to do is drag the slider to the left or the right. Capture One’s sliders seem to be less intense than the ones in Lightroom. The difference isn’t that extreme, but it can be a problem if you want to make the most of your adjustments.
Annotations
Capture One software offers a handy Annotations option. This is very handy in almost every photography genre, especially studio photography. If you’re working with a team, you don’t want to always send feedback to everyone’s email address. Your instructions might be too vague. It’s easier to give feedback by drawing on an image. Capture One makes this very easy. You can highlight specific areas of an image using the Annotations tool. You can then send these annotated images to other members of your team. This can save you a lot of time and stress.
Presets and Other Extensions
Capture One and Lightroom both offer a variety of extensions. These can make your editing process smoother. They can also let you get creative with your work.
Pre-Made Presets
Lightroom goes hand in hand with presets. You can download pre-made presets, which are basically color styles. You can use these color styles to give your photos a specific look. For example, you can make a simple photo look like a vintage picture with one click. You can also make your own custom presets in Lightroom. Many photographers have turned this into a photography business. As a result, there are millions of presets for all kinds of looks, styles, and photography genres. Lightroom also offers bulk editing. You can apply one preset to thousands of photos with one click. Wedding photographers use this very often to edit thousands of photos within minutes. Capture One has presets, too. However, they aren’t as popular as Lightroom presets. There aren’t that many in the Capture One market at the moment. You can’t use Lightroom presets with Capture One software.
HDR, Panorama, and Other Extensions
Besides presets, Lightroom offers a wide variety of extensions. You can access its HDR and panorama tools as soon as you download the program. These are some of the most efficient tools in the editing industry. You can transform your photos into seamless HDR photos or panoramas. If you have Photoshop, you can merge your photos in it without exporting them from Lightroom. You can also download external extensions made by other companies. Lightroom is compatible with all kinds of advanced programs. If you’re not happy with a certain adjustment, there’s a chance that you might find an extension to fix the problem. For example, you can download a plugin like Luminar. You’ll get access to hundreds of settings that you can use in Lightroom. Capture One offers a few extensions. But most are related to organizing and resizing pictures.
Program Versions
The latest version of Lightroom is made for photographers of all kinds. You don’t need a specific camera to edit your pictures efficiently. This has its pros and cons. Lightroom isn’t made for a specific camera brand, which means it’s inclusive. But it can limit photographers who use cameras that aren’t Canon or Nikon. Capture One goes beyond this by offering three different versions of its program:
Capture One Pro: This is the original program that all photographers can use. Capture One Fujifilm: This is made exclusively for Fujifilm camera users. Capture One for Sony: As the name suggests, this version is for Sony camera users.
If you’re a Sony or Fujifilm user, you can benefit greatly from Capture One’s special tools. You might find it easier to color-correct or retouch your images because of these tools.
Tethering
Capture One has tethering features which let you connect your camera to it. Studio photographers often use this to see their images immediately. This saves them a lot of time. You can adjust your camera settings from Capture One in Live Mode. All you need is a compatible camera. This is particularly handy for studio photographers who work with teams. It’s also great for those who want to edit their pictures as they’re being taken. (You’d need an extra editor for that, of course.) You can use Capture One’s official website to see if your camera is compatible with the tethering feature.
Technical Issues
Lightroom Classic tends to crash very often. Every upgrade seems to be slower than the last. This can be very frustrating for photographers with thousands of images they need to edit quickly. The older versions of Lightroom seem to be much more robust. However, if you don’t upgrade, you’ll miss many great features. Most Capture One users don’t need to deal with crashes very often. The program handles a lot of information very well. It also responds quickly to adjustment changes.
Price
Price is, of course, one of the most important things to keep in mind. Your budget, preferences, and future goals can greatly impact your decisions. Adobe now offers a subscription plan. You need to pay a monthly fee to use Lightroom. The monthly fee for Lightroom is the same as for Lightroom and Photoshop. Most photographers use both programs interchangeably, so this is a pretty good deal. The monthly fee is average when compared to services like Netflix. If you’re a professional photographer, this can be a great investment. Capture One is also a subscription-based service. The fee for the main program is almost twice as much as the one for Adobe Lightroom subscribers. If you’re a Fujifilm or Sony user, you can pay much less for Capture One Fujifilm and Capture One (for Sony). This can be a decent investment, given all the capabilities of Capture One. If unsure, you can download a free trial for both programs. You can use Lightroom for free for seven days. Capture One offers a 30-day free trial without any credit card information.
Conclusion
There are many Adobe Lightroom alternatives out there. Capture One is one of the best. Lightroom is a fantastic tool for organizing and editing photos in a few neat modules. Capture One is a brilliant program for advanced color editing, sharpening, and more. So when it comes to Capture One vs Lightroom, which is better? You will enjoy Lightroom if you like experimenting with different styles and effects. You might also like Lightroom more if you enjoy using plugins and extensions. Capture One could be ideal for you if you want to have full control over the colors in your pictures. Capture One is more crash-proof than Lightroom. This can make a huge difference in your workflow. The best thing to do is simultaneously get a free trial for Capture One and Lightroom. Experiment with as many pictures as possible. Within a week, you’ll likely figure out which program you like best.


